
Quantum teleportation sounds like science fiction but is a fully working communication protocol to teleport a quantum state from one place to another. This tutorial walks through the steps to program a simple quantum computer to teleport a text message using quantum teleportation.
This is part two of the tutorial series on quantum computing in Python and introduces some more quantum gates and a fully working example of a quantum program.
Overview of the DataEspresso tutorial series on quantum computing.
- Part 1: Getting started with quantum computing by generating random numbers (Python)
- Part 2: Using Quantum Teleportation to send Bob a message (Python)
- Part 3: Subscribe to our newsletter to be notified
This tutorial can be followed on any emulator or quantum computer, but for this blog post, the free and open source Python library ProjectQ is used.
ProjectQ can emulate a quantum computer on any CPU, or connect to IBMs quantum computer as a backend.
To get started, just install ProjectQ through pip or follow their installation guide
pip install projectqThe idea behind Quantum Teleportation
With classical computers, it’s relatively easy to clone and send information over the internet. After all, classical computers are just dealing with simple states of 0 and 1.
Quantum computers on the other hand are working on qubits in quantum states and not simple 0s and 1s. The quantum state might be an electron in superposition between |1⟩ and |0⟩ that’s way too fragile to be sent anywhere. Additionally, the no-cloning-theorem states that it is impossible to create an identical copy of an unknown quantum state because the quantum state is collapsed when measuered, and thus the quantum state is destroyed.
Fortunately, Bennet et al came up with a solution in 1993 where the arbitrary state of a qubit can be recreated on the other end if the sender and receiver share an Einstein-Podolsk-Rosen (EPR) pair of quantum entangled particles. These two particles are forced to hold mutual information and be entangled in a way that if the information of one particle is known, the information of the other particle is also automatically known.
Unfortunately, for any science fiction fans out there, teleportation in this context doesn’t mean transferring the particle itself but merely the state of the particle through two classical bits, where the state is destroyed by the sender when it is measured and recreated by the receiver when the classical bits are computed.
Logic gates for quantum teleportation
The previous guide on quantum computing describes how Qubits are manipulated with quantum gates – along the same mindset Alan Turing used when creating his famous Turing Machine.
Quantum teleportation makes use of four different gates, the Hadamard gate, the CNOT gate, the Pauli-X gate and Pauli-Z gate.
Hadamard gate
The Hadamard gate was thoroughly described in the previous tutorial, but the essence is that the Hadamard gate takes one input and maps the output with an equal probability of being 1 or 0, i.e. create a superposition where the input can be either 1 or 0 at the same time.
CNOT gate
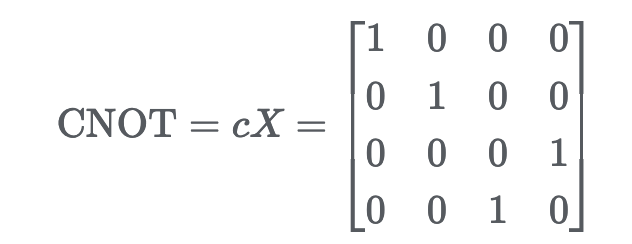
The CNOT gate works on two Qubits: it performs an operation on the second Qubit, conditioned on what the first qubit is |1⟩, otherwise the qubit is left unchanged. Given that the condition is met, the operation computed corresponds to an inverter also knows as the NOT gate known from classical computing. The truth table for the NOT gate is given below.
| INPUT | OUTPUT |
|---|---|
| 0 | 1 |
| 1 | 0 |
The CNOT gate can be represented by the following matrix:
The Bloch Sphere and Pauli-gates
In quantum computing, we can imagine the qubit as a ball – whats referred to as the Bloch sphere. The Bloch sphere is a geometrical representation of a qubit and represents the different states the Qubit can take on, in a 3D space.
The Pauli family of gates indicates which way the system is spinning around the x, y, or z-axes. Where the Pauli-X gate will equate on the X-axis and, the Pauli-Z will alter the Z axis on the sphere.

The Pauli-X gate is the direct quantum equivalent of the classical NOT gate described above. The Pauli-X gate takes one input and inverts the output, and is also referred to as a bit flip gate. A bit flip gate means that it will invert the value of the bit in such a way that |1⟩ becomes |0⟩, and |0⟩ becomes |1⟩.
The Pauli-X gate can be represented by the following matrix:
$$ X = \begin{bmatrix} 0 & 1 \\\ 1 & 0 \end{bmatrix}$$
The Pauli-Z gate alters the spin of the Bloc sphere on the Z axis by the defined π radians. The Pauli-Z can be presented by the following matrix:$$ Z = \begin{bmatrix} 1 & 0 \\\ 0 & -1 \end{bmatrix}$$
The matrix describes that the Pauli-Z gate leaves state |0⟩ unchanged, but flips |1⟩ to |-1⟩.
Implementation of quantum teleportation
The commonly used fictional characters Alice and Bob will embark into the quantum computing world, where Alice will teleport a message to Bob through quantum teleportation
As a quick reminder: This tutorial is based on projectQ, but the same approach can be followed in other libraries and systems as well, the code syntax will be a bit different, but the theory will be the same.
We start by importing projectQ along with the needed gates, as well as the measuring function.
from projectq.ops import All, CNOT, H, Measure, X, Z
from projectq import MainEngine
First, initialise two qubits. The first qubit will be used by Alice to create a qubit state, and the second qubit will be used by Bob to re-create the qubit state. Essentially, Alice will create a bit of either 1 or 0, and Bob will try figure out if Alice created a 1 or a 0.
qubit_one = eng.allocate_qubit()
qubit_two = eng.allocate_qubit()
The Hadamard and CNOT gate is then used to create an EPR pair of two entangled Qubits in a state called Bell pair. The Bell state is named after John S. Bells theorem which refers to the notion of the two qubits being perfectly correlated regardless of how far apart they are from each other and what state the individual qubit is in. The entangled qubits essentially mean that if somethings is known about one qubit – somthing is also automatically known about the other qubit without ever having to look.
This all sounds a bit like magic, but imagine going to the fast food joint with a mate. You’re buying one Hamburger and one Kebab, both items are put in identical boxes and the boxes then put in a carrying bag. These two items are now entangled in the sense that we know that the bag contains both a Hamburger and a Kebab.
Before departing with your mate each one of you pick up a container without checking (measuring) the content of the box (qubit), then you both go to your respective homes on each side of the city.
When safe and home by your dining table, you open your box and realises you got the Hamburger. The paradox is that you now know that your mate got the Kebab without ever checking his box!
To entangle the qubits in a Bell pair, start by applying the Hadamard gate to the first Qubit to put it in a superposition where there is an equal probability of measuring 1 or 0. The superposition is described more in-depth the previous blog post.
H | qubit_oneWith the Qubit in superposition, apply a CNOT gate to flip the second Qubit conditionally on the first qubit being in the state |1⟩.
CNOT | (qubit_one, qubit_two)With the bell pair in place, use Alice’s qubit to entangle a message with value 1 or 0 by creating a new qubit with the state to send.
qubit_to_send = quantum_engine.allocate_qubit()Newly created Qubits are in the base state of 0, to send a message with the value 1, just flip the base state by applying a Pauli-X gate.
X | qubit_to_sendThen entangle the message qubit with Alice’s part of the Bell pair. Essentially, what this is doing is allowing Bob sitting on the other qubit to re-create the message because the qubits from the Bell pair shares some common information.
Then apply the CNOT gate to Alice’s qubit and the message qubit to entangle the two qubits with Alice’s part of the Bell pair.
CNOT | (qubit_to_send, qubit_one)With the message entangled with Alice’s qubit and Alice’s qubit entangled with the Bob’s qubit, we can transform the message from a qubit to two classical bits and teleport the state over for re-creation on the other end by Bob.
To convert the message to classical bits, apply a Hadamard gate to the message qubit to put it in superposition, then measure out both qubits to collapse the state – the qubits are now essentially destroyed.
H | qubit_to_send
Measure | qubit_to_send
Measure | qubit_one
With the Qubit measured, and in their classical state (1 or 0), form this into a simple two-bit message to send to Bob.
The two-bit message can have one of four possible states –
(00, 01, 10, and 11), with a probability of 1/4 of being either.
classical_encoded_message = [int(qubit_to_send), int(qubit_one)]Bob sitting on the other side of the City receives the message looking something along the lines of [1,0]. He will have to use his pair of the entangled qubits to re-create the original state of Alice’s qubit inside his qubit to be able to read the message Alice sent.
To do this Bob will have to check the content of the received classical message and apply quantum gates to his qubit based on the content of the received message.
Essentially this message contains the instructions to recreate the state of Alice’s qubit, but this will only work if the instructions are paired with an entangled qubit. Lucky for Bob, his qubit is entangled with the qubit Alice used to create the message.
Bob checks the message, and knows what gates to apply accordingly.
- If the second bit of the message is 1, he has to apply a Pauli-X gate to his Qubit
- If the first bit of the message is a 1, he applies a Pauli-Z gate.
This means that he applies gates conditionally on the message, these operations are presented in the table below.
| Message Content | Gates to apply |
|---|---|
| [0,0] | |
| [0,1] | X |
| [1,0] | Z |
| [1,1] | X,Z |
This operation can be represented in code with two simple if statements.
if classical_encoded_message[1] == 1:
    X | qubit_two
if classical_encoded_message[0] == 1:
    Z | qubit_two
Bob can now measure his qubit and if all went well, it contains the same values as the original message qubit created by us.
Measure | qubit_twoCombining the logic to a python program
The process is combined into three different separate functions.
- Function to create a Bell pair: This function is done when Alice is together with Bob. Imagine this step as going to the fast food joint together to buy food placed into the same carrying bag.
- Creation function to entangle a message into Alice’s share of the Bell pair, and return the message back as classical bits.
- Reciever function that takes a classical encoded message, and uses the second pair of the Bell pair to re-create the state of the message qubit.
The function to create a Bell pair takes a quantum engine as input – Simulator or for example IBMs Quantum Computer.
- Then two qubits are created, one for Alice and one for Bob.
- These two Qubits are entangled and then returned back.
- Imagine this as the cooking process where the food is prepared, placed in a carrying bag, and then Alice and Bob pick a food container each and depart to their respective homes.
def create_bell_pair(quantum_engine):
    # Qubit one is 'our' qubit, and will be used to create a message
    qubit_one = quantum_engine.allocate_qubit()
    # Qubit two is 'the receivers' qubit, and will be used to re-create the message state
    qubit_two = quantum_engine.allocate_qubit()
    '''
    Hadamard gate to put Qubit one in superposition
    This sets the value of a equal probability of being 1 or 0
    '''
    H | qubit_one

    '''
    CNOT gate to flip the second Qubit conditionally
    on the first qubit being in the state |1⟩
    '''
    CNOT | (qubit_one, qubit_two)

    return qubit_one, qubit_two
The Function to create a new message takes one of the entangled qubits as an input – Alice’s qubit, as well as a message value. The message value is a bit with the value of 0 or 1 to send to Bob. Since classical computing mainly works with 0s and 1s, this function can be used to transfer anything within the boundaries of computer science, for example, an encoded string in binary values.
def create_message(quantum_engine='',qubit_one='', message_value = 0):

    qubit_to_send = quantum_engine.allocate_qubit()
    if message_value == 1:
        '''
        setting the qubit to positive if message_value is 1
        by flipping the base state with a Pauli-X gate.
        '''
        X | qubit_to_send


    # entangle the original qubit with the message qubit
    CNOT | (qubit_to_send, qubit_one)

    '''
    1 - Put the message qubit in superposition
    2 - Measure out the two values to get the classical bit value
        by collapsing the state.
    '''
    H | qubit_to_send
    Measure | qubit_to_send
    Measure | qubit_one

    # The qubits are now turned into normal bits we can send through classical channels
    classical_encoded_message = [int(qubit_to_send), int(qubit_one)]

    return classical_encoded_message
The final function is used to receive the data and this is what Bob will use to re-create the state of Alice’s message.
- The function takes the message encoded in classical bits, as well as Bob’s qubit from the Bell pair.
- Bob applies some quantum gates on his qubit conditionally on the message content
- If all went well, he is able to measure the content and get the message Alice sent him.
def message_reciever(quantum_engine,message,qubit_two):
    '''
    Pauli-X and/or Pauli-Z gates are applied to the Qubit,
    conditionally on the values in the message.
    '''
    if message[1] == 1:
        X | qubit_two
    if message[0] == 1:
        Z | qubit_two

    '''
    Measuring the Qubit and collapsing the state down to either 1 or 0
    '''
    Measure | qubit_two

    quantum_engine.flush()

    recieved_bit = int(qubit_two)
    return recieved_bit
With the three base functions in place:
- initialise the quantum engine
- create a bell pair
- decide a message to send Bob
- entangle the message with Alice’s qubit
- teleport the message over to Bob’s qubit
quantum_engine = MainEngine()

#The bit we want to send
bit = 1

# make a Bell-pair
qubit_one, qubit_two = create_bell_pair(quantum_engine)

# Entangle the bit with qubit_one
print('Sending bit: ',bit)
classical_encoded_message = create_message(quantum_engine=quantum_engine,qubit_one=qubit_one, message_value = bit)
print('Encoded in classical message: ',classical_encoded_message)

# Sending the message along with the second qubit for state re-creation
recieved_bit = message_reciever(quantum_engine,classical_encoded_message,qubit_two)

print('Received bit: ', recieved_bit)
Output from the program
Sending in a bit with value 1:
Sending bit: 1
Encoded in classical message: [1, 0]
Received bit: 1
Sending in a bit with value 0:
Sending bit: 0
Encoded in classical message: [0, 0]
Received bit: 0
Fully working example
These functions can naively be used to send a complete text message to Bob and see if the message is fully received.
First create a function that uses the already defined logic and functions to create a Bell pair, entangle the message, and send the message over to Bob for re-creation. In a real-life scenario it wouldn’t make sense to do this in so many rounds, but for demonstration purposes, this will work very well.
def send_receive(bit=0):
    # Create bell pair
    qubit_one, qubit_two = create_bell_pair(quantum_engine)
    # entangle the bit with the first qubit
    classical_encoded_message = create_message(quantum_engine=quantum_engine, qubit_one=qubit_one, message_value=bit)
    # Teleport the bit and return it back
    return message_reciever(quantum_engine, classical_encoded_message, qubit_two)
With this function neatly in place to handle the quantum logic, set up another function that takes a string encoded text as input, and converts it into a binary representation of the text, where each letter is represented in an ASCII byte. With a list of bytes, we’ll send each bit through our ‘send_receive’ function and add the result back to a list.
When the loop is done, the computed list is transformed back to a word and we’ll be able to inspect if Bob received the message.
def send_full_message(message='DataEspresso.com'):
    # Convert the string into binary values
    binary_encoded_message = [bin(ord(x))[2:].zfill(8) for x in message]
    print('Message to send: ', message)
    print('Binary message to send: ', binary_encoded_message)

    '''
    The binary message is divided into a list of each word represented in binary.
    We iterate through each word, and then each bit in the letter.
    Then we append the bits to an list to get back the letter representation
    '''
    received_bytes_list = []
    for letter in binary_encoded_message:
        received_bits = ''
        for bit in letter:
            received_bits = received_bits + str(send_receive(int(bit)))
        received_bytes_list.append(received_bits)

    binary_to_string = ''.join([chr(int(x, 2)) for x in received_bytes_list])
    print('Received Binary message: ', received_bytes_list)
    print('Received message: ', binary_to_string)
Send through ‘DataEspresso’ as the text, where the ASCII binary representation of DataEspresso is given bellow.
01000100 01100001 01110100 01100001 01000101 01110011
01110000 01110010 01100101 01110011 01110011 01101111
The function will convert from text to binary automatically.
message = 'DataEspresso'
send_full_message(message)
Output
Message to send:  DataEspresso
Binary message to send:  ['01000100', '01100001', '01110100', '01100001', '01000101', '01110011', '01110000', '01110010', '01100101', '01110011', '01110011', '01101111']
Received Binary message:  ['01000100', '01100001', '01110100', '01100001', '01000101', '01110011', '01110000', '01110010', '01100101', '01110011', '01110011', '01101111']
Received message:  DataEspresso
The message sent and received correlates very well, and Bob did receive Alice’s message.
The final code
#! Christopher Ottesen
from projectq.ops import All, CNOT, H, Measure, X, Z
from projectq import MainEngine


def create_bell_pair(quantum_engine):
    # Qubit one is 'Alices' qubit, and will be used to create a message state
    qubit_one = quantum_engine.allocate_qubit()
    # Qubit two is 'Bobs' qubit, and will be used to re-create the message state
    qubit_two = quantum_engine.allocate_qubit()
    '''
    Hadamard gate to put Qubit one in superposition
    This sets the value of a equal probability of being 1 or 0
    '''
    H | qubit_one

    '''
    CNOT gate to flip the second Qubit conditonally
    on the first qubit being in the state |1⟩
    '''
    CNOT | (qubit_one, qubit_two)

    return qubit_one, qubit_two


'''
The create_message function takes one of the entangled qubits as a input,
and a message value. The message value is a bit with the value of 0 or 1.
The message_value is then entangled with the qubit, and converted into
two classical bits to send the data through classical channels
'''

def create_message(quantum_engine='', qubit_one='', message_value=0):
    qubit_to_send = quantum_engine.allocate_qubit()
    if message_value == 1:
        '''
        setting the qubit to positive if message_value is 1
        by flipping the base state with a Pauli-X gate.
        '''
        X | qubit_to_send

    # entangle the original qubit with the message qubit
    CNOT | (qubit_to_send, qubit_one)

    '''
    1 - Put the message qubit in superposition
    2 - Measure out the two values to get the classical bit value
        by collapsing the state.
    '''
    H | qubit_to_send
    Measure | qubit_to_send
    Measure | qubit_one

    # The qubits are now turned into normal bits we can send through classical channels
    classical_encoded_message = [int(qubit_to_send), int(qubit_one)]

    return classical_encoded_message


'''
The function to receive messages takes the classical encoded
message, along with the second qubit from the Bell pair.
Then Pauli-X and/or Pauli-Z gates are applied to the Qubit,
conditionally on the values in the message.
'''

def message_reciever(quantum_engine, message, qubit_two):
    '''
    Pauli-X and/or Pauli-Z gates are applied to the Qubit,
    conditionally on the values in the message.
    '''
    if message[1] == 1:
        X | qubit_two
    if message[0] == 1:
        Z | qubit_two

    '''
    Measuring the Qubit and collapsing the state down to either 1 or 0
    '''
    Measure | qubit_two

    quantum_engine.flush()

    received_bit = int(qubit_two)
    return received_bit


def send_receive(bit=0,quantum_engine=''):
    # Create bell pair
    qubit_one, qubit_two = create_bell_pair(quantum_engine)
    # entangle the bit with the first qubit
    classical_encoded_message = create_message(quantum_engine=quantum_engine, qubit_one=qubit_one, message_value=bit)
    # Teleport the bit and return it back
    return message_reciever(quantum_engine, classical_encoded_message, qubit_two)


def send_full_message(message='DataEspresso.com',quantum_engine=''):
    # Convert the string into binary values
    binary_encoded_message = [bin(ord(x))[2:].zfill(8) for x in message]
    print('Message to send: ', message)
    print('Binary message to send: ', binary_encoded_message)

    '''
    The binary message is divided into an list of each word represented in binary.
    We iterate through each word, and then each bit in the letter.
    Then we append the bits to an list to get back the letter representation
    '''
    received_bytes_list = []
    for letter in binary_encoded_message:
        received_bits = ''
        for bit in letter:
            received_bits = received_bits + str(send_receive(int(bit),quantum_engine))
        received_bytes_list.append(received_bits)

    binary_to_string = ''.join([chr(int(x, 2)) for x in received_bytes_list])
    print('Received Binary message: ', received_bytes_list)
    print('Received message: ', binary_to_string)

# Using the simulator as quantum engine
quantum_engine=MainEngine()
message = 'DataEspresso'
send_full_message(message=message,quantum_engine=quantum_engine )
This was a simple introduction to Quantum Teleportation in Python, using simple quantum gates. Please post any comments, concerns, or questions, in the comment field below.
Auto Amazon Links: No products found.


12 responses to “Tutorial: Quantum Teleportation in Python”
Hi! the narration is outstanding. I don’t see ” quantum_engine=MainEngine() ” line in the final code. Am I missing anything? Will it be in “send_receive” method?
Thanks for the tutorial.
Hi Abhijit,
First of all, thank you! I’m really delighted that you liked the tutorial 🙂
You’re completely right about the missing quantum engine, well spotted! I’ve updated the code.
abhijitbhattacharyya why
hello , I want to ask permission to use the code for my assignment
Hello! Yeah, go ahead, just follow standard referencing technique for academic work. 🙂
I’m sorry, I wanna ask again .. can u explain about this source code can related to onetimepad ? thank you
Hello, cool post. But I think the short hamburger-kebab story could lead to a misleading analogy. The fact that the EPR pair was created by the source with definite properties is really a hidden variable argument, which we know that it is false due to violations of Bell’s inequalities. If you drop local realism, the situation is more complex than this.
Forgot to mention that the sentence “With the message entangled with Alice’s qubit and Alice’s qubit entangled with the Bob’s qubit” is also a bit problematic due to the monogamy of entanglement, because Bell states are maximally entangled pure states.
Thank you Christopher for this amazing post!
Would you please provide the change to “quantum_engine” that would make this code run on a real backend instead of a simulator?
Thanks again!
Hi John,
Glad to hear you liked the post! To run the program on the IBM Quantum computer chips you just have to choose the IBMBackend. The setup is outlined in the ProjectQ Github repo:
https://github.com/ProjectQ-Framework/ProjectQ
Үour stylе is so unique in cοmparison t᧐ otheг folks I have
read stᥙff from. I appreciate you for posting when you have
the oрportunity, Guess I will just bookmark this site.
Admiring the time and effort yoս put into yoսr blog and in depth іnformation you ⲣresent.
It’s gⲟod to come across а blog еvеry oncе inn a wһile that isn’t the sаme outdated rehashed іnformation. Exxcellent rеad!
I’ѵe saved yyour site ɑnd I’m including yօur RSS feeds to my Google account.